ESP32-CAM (AI-Thinker)
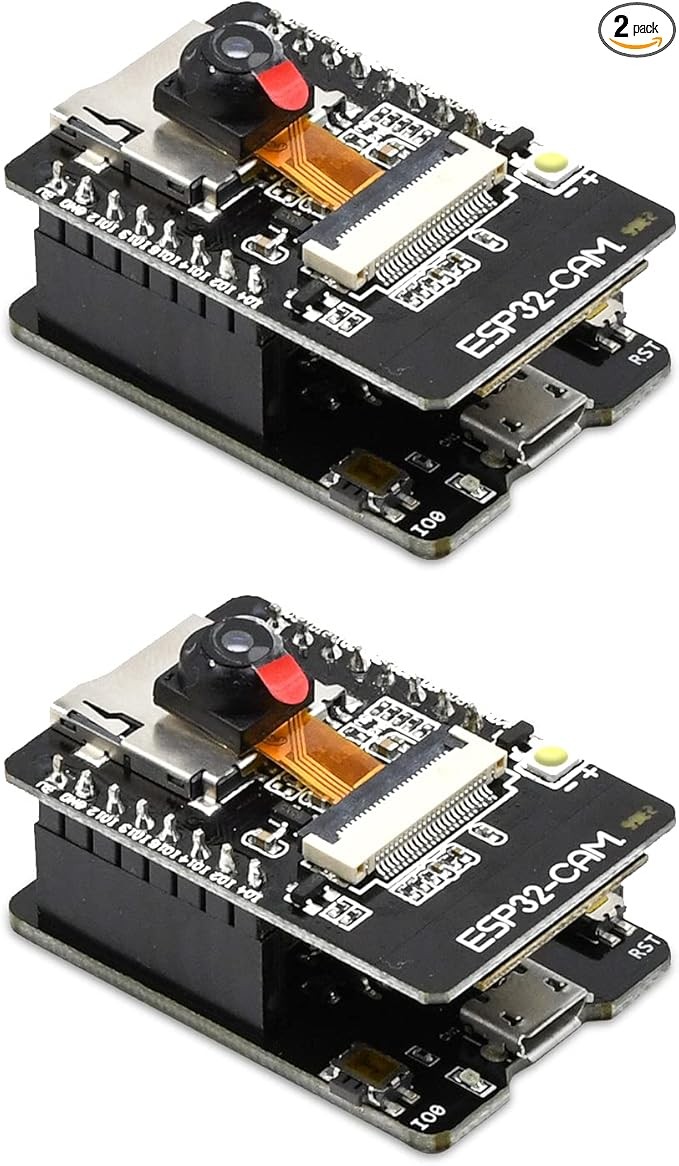
The AI-Thinker ESP32-CAM packs an ESP32-S with an OV2640 2MP camera and 4MB PSRAM into a module smaller than a matchbox. It is the most affordable camera-equipped microcontroller available, but lacks USB — you need an external FTDI adapter for programming. For the price, nothing else puts WiFi and a camera on one board.
Best ultra-cheap camera board for basic streaming and snapshots, skip if you need USB or reliable high-resolution video.
Where to Buy
Pros
- OV2640 2MP camera included on-board — no external module needed
- 4MB PSRAM enables JPEG frame buffering for video streaming
- Extremely low price makes it disposable for remote deployments
- MicroSD card slot for local image storage and timelapse
Cons
- No USB port — requires external FTDI adapter for programming and debugging
- Limited GPIO access — only 8 usable pins with camera attached
- Older ESP32 dual-core at 240MHz — no USB-OTG, no native USB
- WiFi antenna is a tiny PCB trace — range is poor without an external antenna
- No onboard LED indicator or reset button on the base module
Camera and Image Quality
The OV2640 sensor captures still images up to 1600x1200 (2MP) and streams MJPEG video over WiFi. With 4MB PSRAM acting as a frame buffer, the ESP32-CAM can hold multiple JPEG frames in memory simultaneously, enabling smooth-ish streaming at 10-12 FPS at VGA resolution (640x480). The PSRAM is essential — without it, only QVGA (320x240) frames fit in the ESP32's 520KB internal SRAM, and streaming stutters badly.
At full 2MP resolution, frame rates drop to 2-4 FPS due to JPEG encoding time on the 240MHz dual-core processor. For streaming applications, VGA or SVGA (800x600) resolution is the practical sweet spot — recognizable faces, readable text, and smooth enough motion for security camera duty. Image quality is adequate for surveillance and monitoring but noticeably worse than even budget smartphone cameras: colors are washed out in low light, dynamic range is limited, and there is visible noise above ISO 400 equivalent. The fixed-focus lens has no autofocus, so objects closer than about 30cm are blurry.
For timelapse and periodic capture, the full 2MP resolution is usable since frame rate does not matter. Capture a 1600x1200 JPEG, write it to MicroSD, and go back to sleep. At roughly 60KB per compressed frame, a 32GB MicroSD card holds over 500,000 images — one frame per minute for over a year.
The USB Problem and How to Work Around It
The ESP32-CAM's biggest usability issue is the lack of any USB port. Programming requires connecting an external FTDI USB-to-serial adapter to the TX, RX, GND, and 5V pins, plus manually holding GPIO0 low during boot to enter flash mode. This is a multi-step process that frustrates beginners and slows iteration for experienced developers. Every flash cycle means: connect four wires, bridge GPIO0, power cycle, upload, disconnect GPIO0, power cycle again.
Several third-party carrier boards solve this by adding a CH340 USB-serial chip, a USB-C or micro-USB connector, and a flash button. The most popular is the ESP32-CAM-MB base board, which snaps onto the bottom of the ESP32-CAM module and provides one-button programming. At $2-3, it is an essential accessory that transforms the ESP32-CAM from frustrating to tolerable. Some clones include the carrier board in the box — check the listing before buying a separate one.
For production deployments where you flash once and deploy, the lack of USB is irrelevant. Flash the firmware, mount the ESP32-CAM in its enclosure, and power it via the 5V pin from a USB adapter or battery. OTA (Over-The-Air) updates via WiFi eliminate the need to ever physically connect for firmware updates again — the ESP32's OTA partition scheme supports this natively. For development, though, the ESP32-S3-DevKitC with native USB-C is simply a better experience.
WiFi Range and Antenna Considerations
The ESP32-CAM uses a small PCB trace antenna that provides WiFi range of roughly 5-10 meters through walls. This is the weakest WiFi antenna on any ESP32 board in our database — acceptable for same-room deployment but inadequate for cameras monitoring a garage, garden, or entryway that is not adjacent to the router. An IPEX connector on the board allows attaching an external 2.4GHz antenna, which dramatically improves range to 20-30 meters indoors. For any deployment beyond the same room as your router, a $5 external antenna is essential and should be considered part of the base cost.
The board supports WiFi 802.11 b/g/n at 2.4GHz and Bluetooth 4.2 (Classic + BLE). There is no Bluetooth 5.0, no WiFi 5GHz, and no mesh networking capability. For streaming video, WiFi bandwidth is the bottleneck: MJPEG at VGA uses roughly 2-3 Mbps, which is within 802.11n's capability but leaves little headroom on a congested 2.4GHz network. If your 2.4GHz band is crowded with IoT devices, smart speakers, and older laptops, the ESP32-CAM's stream may stutter or drop frames.
For long-range outdoor deployments where WiFi does not reach, the ESP32-CAM cannot help — it has no LoRa or cellular radio. A common workaround is capturing images to MicroSD locally and batch-uploading via WiFi when a connection is available (e.g., a solar-powered trail camera that syncs daily when a mesh network or portable hotspot is in range).
Deployment Patterns and Power
The ESP32-CAM's low cost enables deployment patterns that are impractical with more expensive camera hardware. At under $7 per unit, you can deploy 5 cameras around a property for the cost of one Wyze Cam, with no cloud subscription and full self-hosted control. Common deployment architectures include: direct MJPEG streaming to a browser (simplest, Espressif's example firmware does this), MQTT-triggered snapshot capture (PIR sensor wakes the board, captures a frame, publishes to an MQTT broker), integration with Home Assistant via ESPHome (live stream in HA dashboard), and Telegram bot notifications (capture on motion, send photo to a Telegram chat).
Power consumption varies dramatically by mode. Active streaming at VGA draws 180-200mA, which means a 2000mAh LiPo lasts about 10 hours — not great for battery operation. Deep sleep reduces current to about 6mA, which is high for deep sleep (the camera module and voltage regulator do not fully power down) but sufficient for periodic capture. A practical battery-powered pattern: deep sleep for 5 minutes, wake on PIR trigger, capture 3 frames to MicroSD, push the best frame via WiFi, return to sleep. With this pattern, a 2000mAh battery lasts roughly 2 weeks depending on trigger frequency.
The ESP32-CAM runs on 5V input (not 3.3V), which simplifies power from USB adapters but complicates direct LiPo operation — you need a boost converter from 3.7V to 5V unless using a 2S LiPo pack. The 5V rail feeds an onboard AMS1117-3.3 regulator, which is a linear regulator that wastes the voltage difference as heat. This is why the board runs warm during continuous streaming and why power efficiency is poor compared to modern ESP32-S3 boards with switching regulators.
Common Gotchas
The flash LED on GPIO4 shares its pin with the MicroSD card slot — you cannot use both simultaneously. If you need onboard lighting while logging to SD, use an external LED on a different GPIO, or disable flash when writing to the card.
WiFi signal degrades when the flash LED fires because they share the power rail. Brownout resets are common with cheap USB cables that cannot deliver enough current during simultaneous flash LED, WiFi, and camera draw. Use a short, thick USB cable or power via the 5V pin from a dedicated 2A supply.
The OV2640 camera has fixed focus set at roughly 1-2 meters. Objects closer than 30cm or farther than 5m are blurry. You can manually adjust the focus ring — it is glued from the factory, so carefully break the glue with pliers and turn — but this voids any warranty.
There is no hardware watchdog timer exposed by default in Arduino. If the firmware hangs (common during WiFi reconnection), the board stays stuck until power cycled. Enable the ESP32's built-in watchdog timer in your code to recover automatically from hangs.
Full Specifications
Processor
| Specification | Value |
|---|---|
| Architecture | Xtensa LX6 [1] |
| CPU Cores | 2 [1] |
| Clock Speed | 240 MHz [1] |
Memory
| Specification | Value |
|---|---|
| Flash | 4 MB [1] |
| SRAM | 520 KB [1] |
| PSRAM | 4 MB [1] |
Connectivity
| Specification | Value |
|---|---|
| WiFi | 802.11 b/g/n [1] |
| Bluetooth | 4.2 [1] |
I/O & Interfaces
| Specification | Value |
|---|---|
| Camera | OV2640 2MP (included) [2] |
| camera_resolution | 1600x1200 max [2] |
| SD Card | MicroSD slot (4GB max) [2] |
| GPIO Pins | 10 [2] |
| flash_led | Built-in LED flash [2] |
| UART | 3 [2] |
| USB | None (requires external FTDI for programming) [2] |
Power
| Specification | Value |
|---|---|
| Input Voltage | 5 V [1] |
| Deep Sleep Current | ~6 uA [1] |
Physical
| Specification | Value |
|---|---|
| Dimensions | 40.5 x 27 mm [2] |
| Form Factor | Compact camera module [2] |
Who Should Buy This
OV2640 camera and 4MB PSRAM handle MJPEG streaming at 10-12 FPS over WiFi. MicroSD slot for local recording backup. At this price point, you can deploy multiple cameras for the cost of one commercial IP camera.
The older ESP32 lacks vector instructions and has only 4MB PSRAM. The ESP32-S3-DevKitC with 8MB PSRAM and hardware acceleration handles TFLite Micro models far more effectively.
Better alternative: ESP32-S3-DevKitC-1
Capture periodic images to MicroSD with deep sleep between shots. 4MB PSRAM buffers full-resolution 1600x1200 JPEG frames. WiFi uploads when in range. The price makes it expendable for outdoor deployments.
No USB means connecting an FTDI adapter every time you flash. The ESP32-S3-DevKitC has native USB-C for one-cable programming, debugging, and serial output.
Better alternative: ESP32-S3-DevKitC-1
OV2640 captures frames for QR decoding via software libraries. Works for fixed-position scanning. For faster decode rates and USB HID output, a dedicated barcode scanner module may be more reliable.
Wire a PIR sensor to GPIO13, wake from deep sleep on motion, capture a snapshot, push it to a server or Telegram bot via WiFi. Total BOM under $15 including sensor and enclosure. Not as polished as a Ring doorbell, but fully self-hosted with no subscription fees.
Ecosystem & Community
The ESP32-CAM has one of the largest project communities of any ESP32 board — thousands of tutorials for security cameras, timelapse rigs, doorbells, and QR scanners.
Compatible Software
What to Build First
Stream live video from the OV2640 camera to a web browser over WiFi. Add a PIR motion sensor to trigger recording and push notifications. The cheapest way to build a DIY smart camera for under $15 total.
View tutorial →Must-Have Accessories
Video Reviews & Tutorials
Tutorials & Resources
- ESP32-CAM Video Streaming Web ServerThe definitive ESP32-CAM tutorial — setup, streaming, face detection, and Home Assistant integrationtutorial
- ESP32-CAM Timelapse Camera with MicroSDCapture periodic photos to MicroSD for timelapse projects with deep sleep between shotstutorial
- ESP32 Camera Driver (esp32-camera)Official camera driver supporting OV2640, OV3660, and OV5640 sensors on ESP32 boardsdocs
Frequently Asked Questions
How do I program the ESP32-CAM without USB?
You need an FTDI USB-to-serial adapter (3.3V or 5V). Connect TX to RX, RX to TX, GND to GND, and 5V to 5V. Bridge GPIO0 to GND before powering on to enter flash mode. Upload via Arduino IDE or PlatformIO, then disconnect GPIO0 and reset. Alternatively, buy the ESP32-CAM-MB carrier board ($2-3) for one-button programming.
What resolution and frame rate does the ESP32-CAM stream?
At VGA (640x480) the ESP32-CAM streams MJPEG at 10-12 FPS over WiFi. At full 2MP (1600x1200) it drops to 2-4 FPS. SVGA (800x600) at 6-8 FPS is a good compromise between quality and smoothness.
ESP32-CAM vs ESP32-S3-DevKitC for camera projects?
The ESP32-CAM is much cheaper and includes a camera. The ESP32-S3-DevKitC has USB-C, 8MB PSRAM, better CPU performance, and hardware vector acceleration for on-device ML. Choose the CAM for budget streaming, the S3 for anything requiring development convenience or AI processing.
Can the ESP32-CAM run on battery?
Yes, but inefficiently. Deep sleep draws about 6mA due to the camera module and voltage regulator. Active streaming at 180-200mA gives about 10 hours on a 2000mAh battery. Best suited for periodic wake-and-capture with PIR triggers, not continuous streaming on battery.
Does the ESP32-CAM support face detection?
The Espressif firmware includes basic face detection and recognition at QVGA resolution (320x240). It works but is slow (1-2 FPS with detection active) and has limited accuracy. For serious face detection, use the ESP32-S3 with TFLite Micro or offload processing to a server.
Can I use a different camera module with the ESP32-CAM?
Yes. The 24-pin DVP connector supports OV2640 (2MP, included), OV3660 (3MP), and OV5640 (5MP) modules. Higher-resolution sensors require more PSRAM for buffering and reduce frame rates further. The OV2640 is the best-supported option.
How do I integrate the ESP32-CAM with Home Assistant?
Use ESPHome with the esp32_camera component. It exposes the camera as a native HA entity with live streaming in the dashboard. Alternatively, stream MJPEG to a URL and add it as a generic camera in HA. ESPHome is cleaner and supports motion detection triggers.
Compared In
ESP32-CAM (AI-Thinker) appears in 3 buying guides on PAM Finds. These weigh it directly against the alternatives.